AQS 简介
AbstractQueuedSynchronizer,抽象队列同步器,为JUC包中的各阻塞锁和同步器 提供了一个框架,其基于一个FIFO队列(CLH队列的一种变体),以模板设计模式,为大 多数同步器提供了一个基本的实现。
两个内部类
Node:队列节点类
Node类是AQS的FIFO等待队列的节点类,其主要有以下字段属性:
1 | |
ConditionObject:条件类
ConditionObject实现了Condition接口,用于实现Object的wait/notify/notifyAll方法。
相比Object,Condition更加灵活,最大的优势就是一个锁对象可以有多个条件队列,实现精准唤醒。
主要属性有四个:
1 | |
关于Condition的代码分析将在下一篇中进行。
AQS自身的几个属性
1 | |
AQS子类的实现方式
AQS的子类一般被实现为内部辅助类,如ReentrantLock中的Sync抽象类
(有公平锁FairSync和非公平锁NonfairSync两种内部实现类)。
子类需要实现的几个方法:
1 | |
可以看出,这几个方法分为了共享和独占两种情况,默认会抛出不支持操作异常。
子类可根据要实现的锁的类型,选择部分(如ReentrantLock)或全部(ReentrantReadWriteLock)进行实现。
显然,AQS的实现采用了模板设计模式。
下文将从ReentrantLock为入口,来一窥AQS的精要~
代码分析
获取锁
ReentrantLock的lock()方法
1 | |
Sync的lock()方法
在这里 公平锁和非公平锁出现了第一个不同:非公平锁会立刻去抢一次锁,失败了才走正常流程
1 | |
AQS的acquire()方法
1 |
|
ReentrantLock的tryAcquire()方法
tryAcquire()方法需要实现类自己去实现,在公平锁中,是这样的:
1 | |
hasQueuedPredecessors方法判断队列中是否有其他等待者:
1 | |
再来看看非公平锁的实现:这里和公平锁有第二个不同,锁可用时不管队列里有没有排队的,先抢一波试试
1 | |
AQS的addWaiter()方法
这里回到AQS的acquire方法,tryAcquire失败后,就要乖乖排队了。
1 | |
enq方法:
1 | |
AQS的acquireQueued()方法
正常情况下,到这里就已经成功入队了,然后回到AQS的acquire方法:
1 |
|
在acquireQueued方法中,将完成排队获取锁的操作:
1 | |
shouldParkAfterFailedAcquire方法判断是否要挂起当前线程:
1 | |
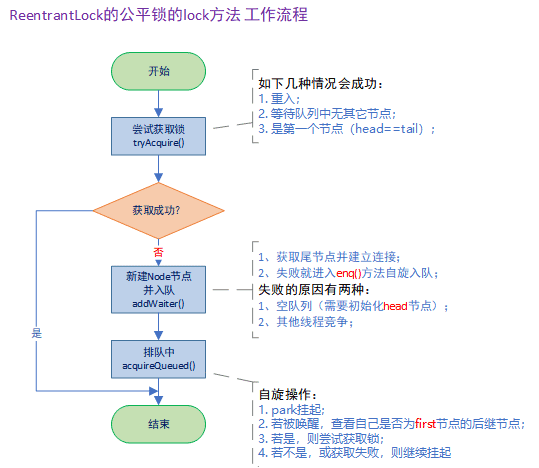
简单以一个流程图总结一下:
释放锁
ReentrantLock的unlock()方法
1 | |
AQS的release()方法
1 | |
ReentrantLock的tryRelease方法
1 | |
AQS的unparkSuccessor方法
1 | |
最后来看一下唤醒后的线程怎么运行吧。
1 | |
–未完待续–
参考文章: