【转】Spring IOC 容器源码分析

开始之前

文章转自Spring IOC 容器源码分析

基本就是里头的东西,只不过自己跟着在源码中转了一遍,会有一点点不一样。

源码版本信息

  • spring-context: 5.1.5.RELEASE

节省篇幅起见,删掉了源码中打印日志相关的代码。

一个简单的开始:ApplicationContext

1
2
3
4
public static void main(String[] args) {
    ApplicationContext context = 
        new ClassPathXmlApplicationContext("classpath:application.xml");
}

其中 ApplicationContext 是Spring中配置应用的核心接口,继承了多个接口,使其拥有了众多功能:

  1. ListableBeanFactory,赋予了它Bean工厂的能力;
  2. ResourceLoader,赋予了它加载文件资源的能力;
  3. ApplicationEventPublisher ,赋予了它向注册的监听器发布事件的能力;
  4. MessageSource,赋予了它处理消息,支持国际化的能力;
  5. 各上下文类成“父子”关系,“子”上下文中的定义优先于“父”上下文的,一整个web项目都可以用一个上下文,而其下的每一个servlet都可以有自己的上下文

在上面代码中,ClassPathXmlApplicationContext是在类路径中寻找xml格式的配置文件,然后根据其内容构建应用上下文。其大致的继承结构如图所示:
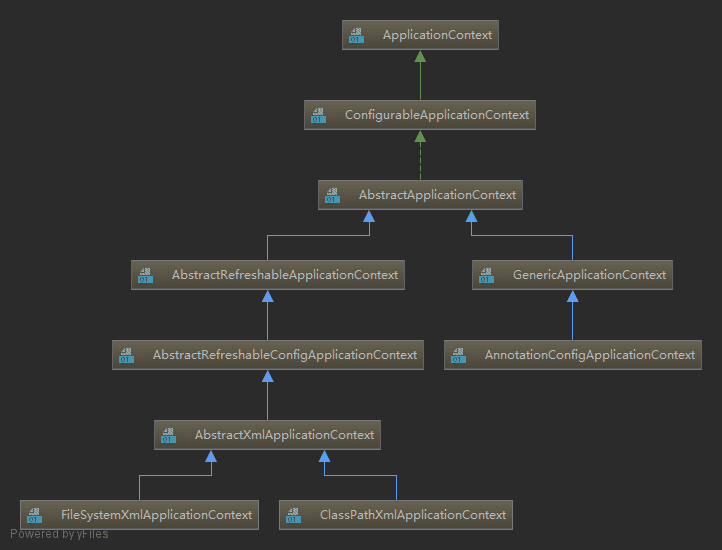
 ApplicationContext继承树

该树的三个叶节点分别是:

  • FileSystemXml...:从系统路径中找xml
  • ClassPathXml...:从类路径找xml
  • AnnotationConfig...:根据注解配置

现在加点实际的东西。

通过上下文容器,来获得一个对象。

首先定义一个接口及其实现类

1
2
3
4
5
6
7
8
9
public interface MessageService {
    String getMsg();
}

public class MessageServiceImpl implements MessageService {
    public String getMsg() {
        return "Hello Spring!";
    }
}

然后是配置文件application.xml

在项目目录的resources下新建一个application.xml,内容如下:

1
2
3
4
5
6
7
8
9
10
<?xml version="1.0" encoding="UTF-8" ?>
<beans xmlns:xsi="http://www.w3.org/2001/XMLSchema-instance"
       xmlns="http://www.springframework.org/schema/beans"
       xsi:schemaLocation="
        http://www.springframework.org/schema/beans 
        http://www.springframework.org/schema/beans/spring-beans.xsd" 
       default-autowire="byName">
    <!--这句是重点-->
    <bean id="messageService" class="com.w.springlearning.example.MessageServiceImpl"/>
</beans>

然后在程序中使用上下文来获取对象实例并调用其接口

1
2
3
4
5
6
7
8
public class Demo {
    public static void main(String[] args) {
        ApplicationContext context = 
            new ClassPathXmlApplicationContext("classpath:application.xml");
        MessageService messageService = context.getBean(MessageService.class);
        System.out.println(messageService.getMsg());
    }
}

例子很简单,原理就复杂了,下面将分析Spring是如何通过配置文件启动ApplicationContext,并在启动过程中创建Bean,注入依赖等。

BeanFactory简介

在上文对ApplicationContext的介绍中,我们知道ApplicationContext继承了ListableBeanFactory接口,使其拥有了Bean工厂的能力,换句话说,ApplicationContext就是一个BeanFactory

先来看一下BeanFactory的继承关系: BeanFactory继承关系

  1. 顶层的BeanFactory都是一些基本的、获取单个Bean的方法;
  2. 第二层的ListableBeanFactory,主要提供了一些获取多个Bean的方法;HierarchicalBeanFactory,顾名思义,提供了将多个BeanFactory设为“父子”关系的方法;AutowireCapableBeanFactory,提供了自动装配Bean的能力;
  3. ApplicationContext,我们的主角,继承了第二层的中的两个,没继承的那个,也通过方法getAutowireCapableBeanFactory()持有了;
  4. ConfigurableListableBeanFactory 继承了第二层中的所有接口,也是个特殊的接口,先提一嘴;
  5. 其它的类就不一一提了。

启动过程分析

先从ClassPathXmlApplicationContext的构造方法说起:

1
2
3
4
5
6
7
8
9
10
11
12
13
14
15
16
17
18
19
20
21
22
public class ClassPathXmlApplicationContext extends AbstractXmlApplicationContext {
    @Nullable
    private Resource[] configResources;
    
    // 已经有ApplicationContext,要设置父子关系,用这个方法
    public ClassPathXmlApplicationContext(ApplicationContext parent) {
        super(parent);
    }
	
    // 全参数的构造方法
    public ClassPathXmlApplicationContext(
            String[] configLocations, boolean refresh, @Nullable ApplicationContext parent)
            throws BeansException {
        super(parent);
        
        // 根据提供的路径,处理成配置文件数组(以分号、逗号、空格、tab、换行符分割)
        setConfigLocations(configLocations);
        if (refresh) {
            refresh(); // 核心方法
        }
    }
}	

其中核心方法是refresh(),之所以叫refresh而不是init之类的,是因为在ApplicationContext建立起来之后, 是可以通过该方法重建的:销毁原有的,建立新的

refresh()

AbstractApplicationContext.java

1
2
3
4
5
6
7
8
9
10
11
12
13
14
15
16
17
18
19
20
21
22
23
24
25
26
27
28
29
30
31
32
33
34
35
36
37
38
39
40
41
42
43
44
45
46
47
48
49
50
51
52
53
54
55
56
57
58
59
60
61
62
63
64
65
66
67
68
69
70
public void refresh() throws BeansException, IllegalStateException {
    // 加锁,保证同时只能进行一个refresh
    // startupShutdownMonitor 这个对象就是为refresh和destory操作加锁存在的
    synchronized (this.startupShutdownMonitor) {
	    
        // 准备工作,记录下容器的启动时间、标记“已启动”状态、处理配置文件中的占位符
        prepareRefresh();
        
        // 这步比较关键,这步完成后,配置文件就会解析成一个个 Bean 定义,注册到 BeanFactory 中,
        // 当然,这里说的 Bean 还没有初始化,只是配置信息都提取出来了,
        // 注册也只是将这些信息都保存到了注册中心(说到底核心是一个 beanName-> beanDefinition 的 map)
        // 注意,这里的beanFactory就是上面曾提了一嘴的继承了2层三个接口的那个。        
        ConfigurableListableBeanFactory beanFactory = obtainFreshBeanFactory();
        
        // 设置 BeanFactory 的类加载器,添加几个 BeanPostProcessor,手动注册几个特殊的 bean
        prepareBeanFactory(beanFactory);
        
        try {
            // 【这里需要知道 BeanFactoryPostProcessor 这个知识点,Bean 如果实现了此接口,
            // 那么在容器初始化以后,Spring 会负责调用里面的 postProcessBeanFactory 方法。】
        
            // 这里是提供给子类的扩展点,到这里的时候,所有的 Bean 都加载、注册完成了,但是都还没有初始化
            // 具体的子类可以在这步的时候添加一些特殊的 BeanFactoryPostProcessor 的实现类或做点什么事 subclasses.
            postProcessBeanFactory(beanFactory);
        
            // 调用 BeanFactoryPostProcessor 各个实现类的 postProcessBeanFactory(factory) 方法
            invokeBeanFactoryPostProcessors(beanFactory);
        
            // 注册 BeanPostProcessor 的实现类,注意看和 BeanFactoryPostProcessor 的区别
            // 此接口两个方法: postProcessBeforeInitialization 和 postProcessAfterInitialization
            // 两个方法分别在 Bean 初始化之前和初始化之后得到执行。注意,到这里 Bean 还没初始化
            registerBeanPostProcessors(beanFactory);
        
            // 初始化当前 ApplicationContext 的 MessageSource,国际化这里就不展开说了,不然没完没了了
            initMessageSource();
        
            // 初始化当前 ApplicationContext 的事件广播器,这里也不展开了
            initApplicationEventMulticaster();
        
            // 从方法名就可以知道,典型的模板方法(钩子方法),
            // 具体的子类可以在这里初始化一些特殊的 Bean(在初始化 singleton beans 之前)
            onRefresh();
        
            // 注册事件监听器,监听器需要实现 ApplicationListener 接口。这也不是我们的重点,过
            registerListeners();
        
            // 重点,重点,重点
            // 初始化所有的 singleton beans
            //(lazy-init 的除外)
            finishBeanFactoryInitialization(beanFactory);
        
            // 最后,广播事件,ApplicationContext 初始化完成
            finishRefresh();
        }
        catch (BeansException ex) {        
            // 销毁已经初始化的 singleton 的 Beans,以免有些 bean 会一直占用资源
            destroyBeans();
        
            // Reset 'active' flag.
            cancelRefresh(ex);
        
            throw ex;
        }
        finally {
            // Reset common introspection caches in Spring's core, since we
            // might not ever need metadata for singleton beans anymore...
            resetCommonCaches();
        }
    }
}

创建容器前的准备工作:prepareRefresh()

AbstractApplicationContext.java

1
2
3
4
5
6
7
8
9
10
11
12
13
14
15
16
17
18
19
20
21
22
23
24
25
26
27
protected void prepareRefresh() {
	// 记录启动时间.
	this.startupDate = System.currentTimeMillis();
	// 设置两个标识,两个都是 AtomBoolean类型的
	this.closed.set(false);
	this.active.set(true);

	// Initialize any placeholder property sources in the context environment.
	initPropertySources();

	// 校验 XML 配置文件
	getEnvironment().validateRequiredProperties();

	// Store pre-refresh ApplicationListeners...
	if (this.earlyApplicationListeners == null) {
		this.earlyApplicationListeners = new LinkedHashSet<>(this.applicationListeners);
	}
	else {
		// Reset local application listeners to pre-refresh state.
		this.applicationListeners.clear();
		this.applicationListeners.addAll(this.earlyApplicationListeners);
	}

	// Allow for the collection of early ApplicationEvents,
	// to be published once the multicaster is available...
	this.earlyApplicationEvents = new LinkedHashSet<>();
}

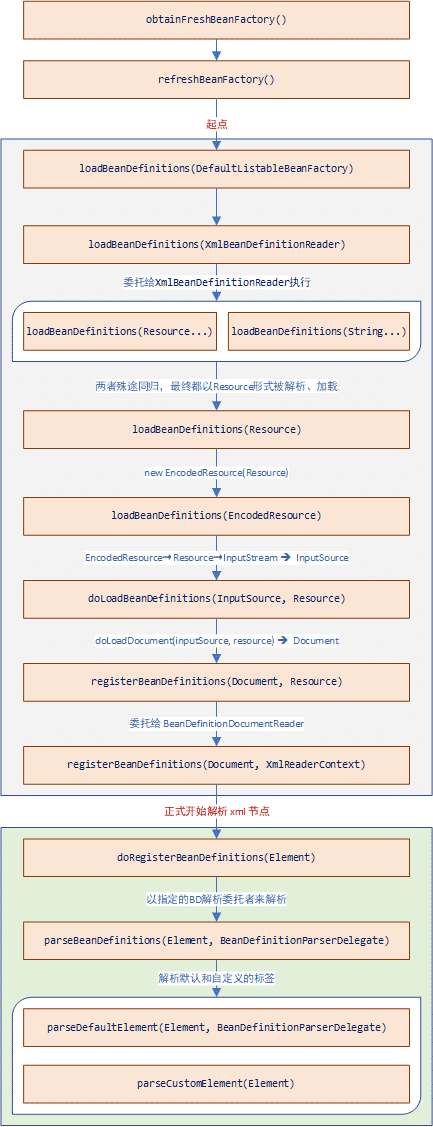
注册Bean到工厂中:obtainFreshBeanFactory()

AbstractApplicationContext.java

1
2
3
4
5
6
protected ConfigurableListableBeanFactory obtainFreshBeanFactory() {
    // 关闭旧的BeanFactory(若有)
    // 创建新的BeanFactory,并加载Bean定义且注册等
    refreshBeanFactory();
    return getBeanFactory();
}

AbstractRefreshableApplicationContext.java

1
2
3
4
5
6
7
8
9
10
11
12
13
14
15
16
17
18
19
20
21
22
23
24
25
26
27
28
protected final void refreshBeanFactory() throws BeansException {
    // 如果 ApplicationContext 中已经加载过 BeanFactory 了,销毁所有 Bean,关闭 BeanFactory
    // 注意,应用中 BeanFactory 本来就是可以多个的,这里可不是说应用全局是否有 BeanFactory,而是当前
    // ApplicationContext 是否有 BeanFactory
    if (hasBeanFactory()) {
        destroyBeans();
        closeBeanFactory();
    }
    try {
        // 初始化一个 DefaultListableBeanFactory
        DefaultListableBeanFactory beanFactory = createBeanFactory();
        // 用于 BeanFactory 的序列化,大部分情况下用不到吧
        beanFactory.setSerializationId(getId());
        
        // 设置 BeanFactory 的两个配置属性:
        // 是否允许 Bean 覆盖、是否允许循环引用
        customizeBeanFactory(beanFactory);
        
        // 加载 Bean 到 BeanFactory 中
        loadBeanDefinitions(beanFactory);
        synchronized (this.beanFactoryMonitor) {
            this.beanFactory = beanFactory;
        }
    }
    catch (IOException ex) {
        throw new ApplicationContextException("I/O error parsing bean definition source for " + getDisplayName(), ex);
    }
}

到这里其实可以看到,虽然前面提到说 ApplicationContext继承了两个 BeanFactory接口, 但是其本身不实现相应的方法,而是通过(委托)内部持有的 DefaultListableBeanFactory来完成BeanFactory相关的操作

为啥是 DefaultListableBeanFactory?此处再看一下BeanFactory的继承树: BeanFactory继承关系 DefaultListableBeanFactory在图中最下方,实现了可见的所有接口,功能最全。

如果你想要在程序运行的时候动态往 Spring IOC 容器注册新的 bean,就会使用到这个类。那我们怎么在运行时获得这个实例呢? 之前我们说过 ApplicationContext 接口能获取到 AutowireCapableBeanFactory,就是最右上角那个,然后它向下转型就能得到 DefaultListableBeanFactory 了。

在进一步向下之前,我们需要了解一下什么是BeanDefinition。上文提到,将Bean注册到BeanFactory, 可以简单理解为是一个完成 BeanName 到 BeanDefinition 的Map过程,这里的 BeanDefinition 保存了 Bean 的信息, 比如这个 Bean 指向的是哪个类、是否是单例的、是否懒加载、这个 Bean 依赖了哪些 Bean 等等。

简单来说,Bean和BeanDefinition 类似于 实例和类的关系吧。

BeanDefinition定义
1
2
3
4
5
6
7
8
9
10
11
12
13
14
15
16
17
18
19
20
21
22
23
24
25
26
27
28
29
30
31
32
33
34
35
36
37
38
39
40
41
42
43
44
45
46
47
48
49
50
51
52
53
54
55
56
57
58
59
60
61
62
63
64
// 节省篇幅,省略所有set方法对应的get方法
public interface BeanDefinition extends AttributeAccessor, BeanMetadataElement {
    // Spring 默认支持的两种模式:SINGLETON、PROTOTYPE
    // 还有 request, session, globalSession, application, websocket 这几种
    // 属于web 的扩展
    String SCOPE_SINGLETON = ConfigurableBeanFactory.SCOPE_SINGLETON;
    String SCOPE_PROTOTYPE = ConfigurableBeanFactory.SCOPE_PROTOTYPE;
    
    // 暂且跳过
    int ROLE_APPLICATION = 0;
    int ROLE_SUPPORT = 1;
    int ROLE_INFRASTRUCTURE = 2;
    
    // 父Bean名称,涉及Bean继承(非Java的继承,仅继承配置信息)
    void setParentName(@Nullable String parentName);
    
    // Bean的类名称
    void setBeanClassName(@Nullable String beanClassName);
    
    // Bean的scope
    void setScope(@Nullable String scope);
    
    // 懒加载
    void setLazyInit(boolean lazyInit);
    
    // 依赖
    void setDependsOn(@Nullable String... dependsOn);
    
    // 是否可注入其他bean,只对根据类型注入有效
    void setAutowireCandidate(boolean autowireCandidate);
    
    // 优先注入,若有多个相同类型的bean,spring优先选择该值为true的
    void setPrimary(boolean primary);
    
    // 生成该Bean的工厂名称
    void setFactoryBeanName(@Nullable String factoryBeanName);
    // 生成该Bean的工厂方法名称
    void setFactoryMethodName(@Nullable String factoryMethodName);
    
    // Bean的构造方法参数
    ConstructorArgumentValues getConstructorArgumentValues();
    // Bean的属性值
    MutablePropertyValues getPropertyValues();
    
    // Bean的初始化方法
    void setInitMethodName(@Nullable String initMethodName);
    // Bean的销毁方法
    void setDestroyMethodName(@Nullable String destroyMethodName);
    
    // 上面跳过的三个Role
    void setRole(int role);
    
    // 人可读的描述信息
    void setDescription(@Nullable String description);
    
    boolean isSingleton();
    boolean isPrototype();
    // 不可被实例化,只可作为父bean
    boolean isAbstract();
    @Nullable
    String getResourceDescription();
    @Nullable
    BeanDefinition getOriginatingBeanDefinition();    
}

众多依赖信息,先求个眼熟。但是可以看到,里头并没有getInstance之类的方法来获取实例,这点后面会说。

介绍完 BeanDefinition,再回到之前的refreshBeanFactory方法。 在有一个BeanFactory之后,还有两步要走:

1
2
3
4
5
    // 设置 BeanFactory 的两个配置属性:
    // 是否允许 Bean 覆盖、是否允许循环引用
    customizeBeanFactory(beanFactory);
    // 加载 Bean 到 BeanFactory 中
    loadBeanDefinitions(beanFactory);

先看第一个:

customizeBeanFactory

这个比较简单,就是设置两个Boolean值

1
2
3
4
5
6
7
8
9
10
11
protected void customizeBeanFactory(DefaultListableBeanFactory beanFactory) {
    // 是否允许Bean的定义覆盖
    // 默认同一文件覆盖会报错,不同文件可以覆盖
    if (this.allowBeanDefinitionOverriding != null) {
        beanFactory.setAllowBeanDefinitionOverriding(this.allowBeanDefinitionOverriding);
    }
    // 是否允许循环引用
    if (this.allowCircularReferences != null) {
        beanFactory.setAllowCircularReferences(this.allowCircularReferences);
    }
}
重头戏:loadBeanDefinitions

AbstractXmlApplicationContext.java

1
2
3
4
5
6
7
8
9
10
11
12
13
14
15
16
17
18
19
20
21
22
23
24
25
26
27
28
29
30
31
protected void loadBeanDefinitions(DefaultListableBeanFactory beanFactory) throws BeansException, IOException {
    // 通过一个 XmlBeanDefinitionReader 来加载Bean.
    XmlBeanDefinitionReader beanDefinitionReader = new XmlBeanDefinitionReader(beanFactory);

    // Configure the bean definition reader with this context's
    // resource loading environment.
    beanDefinitionReader.setEnvironment(this.getEnvironment());
    beanDefinitionReader.setResourceLoader(this);
    beanDefinitionReader.setEntityResolver(new ResourceEntityResolver(this));

    // 提供给子类覆写来实现自定义的初始化(貌似没有子类用)
    initBeanDefinitionReader(beanDefinitionReader);
    // 重点来了
    loadBeanDefinitions(beanDefinitionReader);
}


// 通过Reader加载XML文件
// 两个分支殊途同归,最终都会根据Resource来加载
// 因此我们就跟着第一个分支走
// 入参是 XmlBeanDefinitionReader,该方法实际是委托 XmlBeanDefinitionReader 来执行的
protected void loadBeanDefinitions(XmlBeanDefinitionReader reader) throws BeansException, IOException {
    Resource[] configResources = getConfigResources();
    if (configResources != null) {
        reader.loadBeanDefinitions(configResources);
    }
    String[] configLocations = getConfigLocations();
    if (configLocations != null) {
        reader.loadBeanDefinitions(configLocations);
    }
}

AbstractBeanDefinitionReader.java

1
2
3
4
5
6
7
8
9
10
11
@Override
public int loadBeanDefinitions(Resource... resources) throws BeanDefinitionStoreException {
    Assert.notNull(resources, "Resource array must not be null");
    int count = 0;
    // 每个文件是一个Resource,循环去加载
    for (Resource resource : resources) {
        count += loadBeanDefinitions(resource);
    }
    // 返回一共加载的BeanDefinition数量
    return count;
}

XmlBeanDefinitionReader.java

1
2
3
4
5
6
7
8
9
10
11
12
13
14
15
16
17
18
19
20
21
22
23
24
25
26
27
28
29
30
31
32
33
34
35
36
37
38
39
40
41
42
43
44
45
46
47
48
49
50
51
52
53
54
55
56
57
58
59
60
61
62
63
64
65
66
67
68
69
70
@Override
public int loadBeanDefinitions(Resource resource) throws BeanDefinitionStoreException {
    return loadBeanDefinitions(new EncodedResource(resource));
}

public int loadBeanDefinitions(EncodedResource encodedResource) throws BeanDefinitionStoreException {
    Assert.notNull(encodedResource, "EncodedResource must not be null");
    
    // private final ThreadLocal<Set<EncodedResource>> resourcesCurrentlyBeingLoaded;
    // 用一个ThreadLocal来存放文件资源
    Set<EncodedResource> currentResources = this.resourcesCurrentlyBeingLoaded.get();
    if (currentResources == null) {
        currentResources = new HashSet<>(4);
        this.resourcesCurrentlyBeingLoaded.set(currentResources);
    }
    if (!currentResources.add(encodedResource)) {
        throw new BeanDefinitionStoreException(
                "Detected cyclic loading of " + encodedResource + " - check your import definitions!");
    }
    try {
        InputStream inputStream = encodedResource.getResource().getInputStream();
        try {
            InputSource inputSource = new InputSource(inputStream);
            if (encodedResource.getEncoding() != null) {
                inputSource.setEncoding(encodedResource.getEncoding());
            }
            
            // 关键方法
            return doLoadBeanDefinitions(inputSource, encodedResource.getResource());
        }
        finally {
            inputStream.close();
        }
    }
    catch (IOException ex) {
        throw new BeanDefinitionStoreException(
                "IOException parsing XML document from " + encodedResource.getResource(), ex);
    }
    finally {
        currentResources.remove(encodedResource);
        if (currentResources.isEmpty()) {
            this.resourcesCurrentlyBeingLoaded.remove();
        }
    }
}


protected int doLoadBeanDefinitions(InputSource inputSource, Resource resource)
        throws BeanDefinitionStoreException {
    try {
        // 将 xml 文件转换为 Document 对象
        Document doc = doLoadDocument(inputSource, resource);
        // 关键方法:注册BeanDefinition
        int count = registerBeanDefinitions(doc, resource);
        return count;
    }
    // 各种异常处理
    catch (...) {
        ...
    }
}

public int registerBeanDefinitions(Document doc, Resource resource) throws BeanDefinitionStoreException {
    BeanDefinitionDocumentReader documentReader = createBeanDefinitionDocumentReader();
    int countBefore = getRegistry().getBeanDefinitionCount();
    // 关键方法,继续向下
    documentReader.registerBeanDefinitions(doc, createReaderContext(resource));
    // 返回从当前文件加载了多少BeanDefinition
    return getRegistry().getBeanDefinitionCount() - countBefore;
}

DefaultBeanDefinitionDocumentReader.java

1
2
3
4
5
6
7
8
9
10
11
12
13
14
15
16
17
18
19
20
21
22
23
24
25
26
27
28
29
30
31
32
33
34
35
36
37
38
39
40
41
42
43
44
45
46
47
48
49
50
51
52
53
54
55
56
57
58
59
60
@Override
public void registerBeanDefinitions(Document doc, XmlReaderContext readerContext) {
    this.readerContext = readerContext;
    // 从 xml 根节点开始解析文件
    doRegisterBeanDefinitions(doc.getDocumentElement());
}

@SuppressWarnings("deprecation")  // for Environment.acceptsProfiles(String...)
protected void doRegisterBeanDefinitions(Element root) {
    // 我们看名字就知道,BeanDefinitionParserDelegate 必定是一个重要的类,它负责解析 Bean 定义,
    // 这里为什么要定义一个 parent? 看到后面就知道了,是递归问题,
    // 因为 <beans /> 内部是可以定义 <beans /> 的,所以这个方法的 root 其实不一定就是 xml 的根节点,也可以是嵌套在里面的 <beans /> 节点,
    // 从源码分析的角度,我们当做根节点就好了
    BeanDefinitionParserDelegate parent = this.delegate;
    this.delegate = createDelegate(getReaderContext(), root, parent);

    if (this.delegate.isDefaultNamespace(root)) {
        // 这块说的是根节点 <beans ... profile="dev" /> 中的 profile 是否是当前环境需要的,
        String profileSpec = root.getAttribute(PROFILE_ATTRIBUTE);
        if (StringUtils.hasText(profileSpec)) {
            String[] specifiedProfiles = StringUtils.tokenizeToStringArray(
                    profileSpec, BeanDefinitionParserDelegate.MULTI_VALUE_ATTRIBUTE_DELIMITERS);

            if (!getReaderContext().getEnvironment().acceptsProfiles(specifiedProfiles)) {
                // 如果当前环境配置的 profile 不包含此 profile,那就直接 return 了,不对此 <beans /> 解析
                return;
            }
        }
    }

    preProcessXml(root);
    // 继续 ↓
    parseBeanDefinitions(root, this.delegate);
    postProcessXml(root);

    this.delegate = parent;
}

protected void parseBeanDefinitions(Element root, BeanDefinitionParserDelegate delegate) {
    if (delegate.isDefaultNamespace(root)) {
        NodeList nl = root.getChildNodes();
        for (int i = 0; i < nl.getLength(); i++) {
            Node node = nl.item(i);
            if (node instanceof Element) {
                Element ele = (Element) node;
                if (delegate.isDefaultNamespace(ele)) {
                    // default namespace 涉及到的就四个标签 <import />、<alias />、<bean /> 和 <beans />
                    parseDefaultElement(ele, delegate);
                }
                else {
                    // 解析其他 namespace 的元素
                    delegate.parseCustomElement(ele);
                }
            }
        }
    }
    else {
        delegate.parseCustomElement(root);
    }
}

可以看到解析BeanDefinition分成两种:

  1. Default Element: 即 xmlns="http://www.springframework.org/schema/beans"下的四个标签 <import /><alias /><bean /><beans />
  2. Custom Element: 其他标签,如我们经常会使用到的 <mvc /><task /><context /><aop />等。

如果要解析这些非Default的标签,就要在XML头部引入相应的namespace及.xsd的文件路径,如下所示,同时代码中需要提供相应的 parser 来解析, 如 MvcNamespaceHandler、TaskNamespaceHandler、ContextNamespaceHandler、AopNamespaceHandler 等。

1
2
3
4
5
6
7
8
9
10
11
12
13
14
<?xml version="1.0" encoding="UTF-8" ?>
<beans xmlns:xsi="http://www.w3.org/2001/XMLSchema-instance"
       xmlns="http://www.springframework.org/schema/beans"
       xmlns:context="http://www.springframework.org/schema/context"
       xmlns:mvc="http://www.springframework.org/schema/mvc"       
       xsi:schemaLocation="
           http://www.springframework.org/schema/beans
           http://www.springframework.org/schema/beans/spring-beans.xsd"
           http://www.springframework.org/schema/context
           http://www.springframework.org/schema/context/spring-context.xsd
           http://www.springframework.org/schema/mvc   
           http://www.springframework.org/schema/mvc/spring-mvc.xsd  
       default-autowire="byName">
</beans>

回头再看看处理default标签的方法:

DefaultBeanDefinitionDocumentReader.java

1
2
3
4
5
6
7
8
9
10
11
12
13
14
15
16
17
18
19
20
21
22
23
24
25
26
27
28
29
30
31
32
33
34
35
private void parseDefaultElement(Element ele, BeanDefinitionParserDelegate delegate) {
    if (delegate.nodeNameEquals(ele, IMPORT_ELEMENT)) {
        importBeanDefinitionResource(ele);
    }
    else if (delegate.nodeNameEquals(ele, ALIAS_ELEMENT)) {
        processAliasRegistration(ele);
    }
    // 下面重点讲一下解析<bean />标签的方法
    else if (delegate.nodeNameEquals(ele, BEAN_ELEMENT)) {
        processBeanDefinition(ele, delegate);
    }
    else if (delegate.nodeNameEquals(ele, NESTED_BEANS_ELEMENT)) {
        // recurse
        doRegisterBeanDefinitions(ele);
    }
}

protected void processBeanDefinition(Element ele, BeanDefinitionParserDelegate delegate) {
    // 将 <bean /> 节点中的信息提取出来,然后封装到一个 BeanDefinitionHolder 中,细节往下看
    BeanDefinitionHolder bdHolder = delegate.parseBeanDefinitionElement(ele);
    if (bdHolder != null) {
        // 解析自定义属性
        bdHolder = delegate.decorateBeanDefinitionIfRequired(ele, bdHolder);
        try {
            // 注册Bean
            BeanDefinitionReaderUtils.registerBeanDefinition(bdHolder, getReaderContext().getRegistry());
        }
        catch (BeanDefinitionStoreException ex) {
            getReaderContext().error("Failed to register bean definition with name '" +
                    bdHolder.getBeanName() + "'", ele, ex);
        }
        // 发送注册事件
        getReaderContext().fireComponentRegistered(new BeanComponentDefinition(bdHolder));
    }
}

在解析<bean />前,回顾一下Bean都有哪些属性

  1. class
  2. name:可指定 id、name(用逗号、分号、空格分隔)
  3. scope
  4. constructor-arg
  5. properties
  6. autowiring mode:no(默认值)、byName、byType、 constructor
  7. lazy-initialization mode:是否懒加载(如果被非懒加载的bean依赖了那么其实也就不能懒加载了)
  8. initialization method:bean 属性设置完成后,会调用这个方法
  9. destruction method: bean 销毁后的回调方法

这些属性其实就是与BeanDefinition这个类里出现过的get/set方法对应的。例子如下:

1
2
3
4
5
6
7
8
9
10
11
12
13
14
15
<bean id="exampleBean" name="name1, name2, name3" class="com.javadoop.ExampleBean"
      scope="singleton" lazy-init="true" init-method="init" destroy-method="cleanup">

    <!-- 可以用下面三种形式指定构造参数 -->
    <constructor-arg type="int" value="7500000"/>
    <constructor-arg name="years" value="7500000"/>
    <constructor-arg index="0" value="7500000"/>

    <!-- property 的几种情况 -->
    <property name="beanOne">
        <ref bean="anotherExampleBean"/>
    </property>
    <property name="beanTwo" ref="yetAnotherBean"/>
    <property name="integerProperty" value="1"/>
</bean>

回到解析<bean />的方法中:

BeanDefinitionParserDelegate.java

1
2
3
4
5
6
7
8
9
10
11
12
13
14
15
16
17
18
19
20
21
22
23
24
25
26
27
28
29
30
31
32
33
34
35
36
37
38
39
40
41
42
43
44
45
46
47
48
49
50
51
52
53
54
55
56
57
58
public BeanDefinitionHolder parseBeanDefinitionElement(Element ele) {
    return parseBeanDefinitionElement(ele, null);
}

public BeanDefinitionHolder parseBeanDefinitionElement(Element ele, @Nullable BeanDefinition containingBean) {
    String id = ele.getAttribute(ID_ATTRIBUTE);
    String nameAttr = ele.getAttribute(NAME_ATTRIBUTE);

    // 按 ",; " 三种符号来切分name属性值,将其全部放入别名列表
    List<String> aliases = new ArrayList<>();
    if (StringUtils.hasLength(nameAttr)) {
        String[] nameArr = StringUtils.tokenizeToStringArray(nameAttr, MULTI_VALUE_ATTRIBUTE_DELIMITERS);
        aliases.addAll(Arrays.asList(nameArr));
    }

    // 将id作为bean名称,若没有,则将第一个别名作为bean名称
    String beanName = id;
    if (!StringUtils.hasText(beanName) && !aliases.isEmpty()) {
        beanName = aliases.remove(0);
    }

    // 校验bean名称和别名在当前层级的<bean />的唯一性
    if (containingBean == null) {
        checkNameUniqueness(beanName, aliases, ele);
    }

    // 根据<bean >...<bean />中的配置,生成一个BeanDefinition实例
    AbstractBeanDefinition beanDefinition = parseBeanDefinitionElement(ele, beanName, containingBean);
    if (beanDefinition != null) {
        // 若bean名称未被设置:↓
        if (!StringUtils.hasText(beanName)) {
            try {
                if (containingBean != null) {
                    beanName = BeanDefinitionReaderUtils.generateBeanName(
                            beanDefinition, this.readerContext.getRegistry(), true);
                }
                else {
                    // beanName为“类全路径名#数字”
                    // beanClassName为“类全路径名”
                    beanName = this.readerContext.generateBeanName(beanDefinition);
                    String beanClassName = beanDefinition.getBeanClassName();
                    if (beanClassName != null &&
                            beanName.startsWith(beanClassName) && beanName.length() > beanClassName.length() &&
                            !this.readerContext.getRegistry().isBeanNameInUse(beanClassName)) {
                        aliases.add(beanClassName);
                    }
                }
            }
            catch (Exception ex) {
                error(ex.getMessage(), ele);
                return null;
            }
        }
        String[] aliasesArray = StringUtils.toStringArray(aliases);
        return new BeanDefinitionHolder(beanDefinition, beanName, aliasesArray);
    }
    return null;
}

来看看是怎么根据配置文件来生成BeanDefinition实例的

1
2
3
4
5
6
7
8
9
10
11
12
13
14
15
16
17
18
19
20
21
22
23
24
25
26
27
28
29
30
31
32
33
34
35
36
37
38
39
40
41
42
43
44
45
46
public AbstractBeanDefinition parseBeanDefinitionElement(
        Element ele, String beanName, @Nullable BeanDefinition containingBean) {

    this.parseState.push(new BeanEntry(beanName));

    String className = null;
    if (ele.hasAttribute(CLASS_ATTRIBUTE)) {
        className = ele.getAttribute(CLASS_ATTRIBUTE).trim();
    }
    String parent = null;
    if (ele.hasAttribute(PARENT_ATTRIBUTE)) {
        parent = ele.getAttribute(PARENT_ATTRIBUTE);
    }

    try {
        // 创建 bd,然后设置类信息、父bean信息
        AbstractBeanDefinition bd = createBeanDefinition(className, parent);
        // 设置 bd的属性,在AbstractBeanDefinition里
        parseBeanDefinitionAttributes(ele, beanName, containingBean, bd);
        bd.setDescription(DomUtils.getChildElementValueByTagName(ele, DESCRIPTION_ELEMENT));
        
        // 下面是解析<bean />内各子元素的
        // <meta />
        parseMetaElements(ele, bd);
        // <lookup-method />
        parseLookupOverrideSubElements(ele, bd.getMethodOverrides());
        // <replaced-method />
        parseReplacedMethodSubElements(ele, bd.getMethodOverrides());
        // <constructor-arg />
        parseConstructorArgElements(ele, bd);
        // <property />
        parsePropertyElements(ele, bd);
        // <qualifier />
        parseQualifierElements(ele, bd);

        bd.setResource(this.readerContext.getResource());
        bd.setSource(extractSource(ele));

        return bd;
    }
    catch (...) { ... }
    finally {
        this.parseState.pop();
    }
    return null;
}

到此,完成了一个<bean />BeanDefinitionHolder,回到解析<bean />的方法上:

DefaultBeanDefinitionDocumentReader.java

1
2
3
4
5
6
7
8
9
10
11
12
13
14
15
16
17
18
protected void processBeanDefinition(Element ele, BeanDefinitionParserDelegate delegate) {
    // 将 <bean /> 节点中的信息提取出来,然后封装到一个 BeanDefinitionHolder 中,细节往下看
    BeanDefinitionHolder bdHolder = delegate.parseBeanDefinitionElement(ele);
    if (bdHolder != null) {
        // 解析自定义属性
        bdHolder = delegate.decorateBeanDefinitionIfRequired(ele, bdHolder);
        try {
            // 用给定的bean工厂注册Bean
            BeanDefinitionReaderUtils.registerBeanDefinition(bdHolder, getReaderContext().getRegistry());
        }
        catch (BeanDefinitionStoreException ex) {
            getReaderContext().error("Failed to register bean definition with name '" +
                    bdHolder.getBeanName() + "'", ele, ex);
        }
        // 发送注册事件
        getReaderContext().fireComponentRegistered(new BeanComponentDefinition(bdHolder));
    }
}

这个时候我们已经有了一个BeanDefinitionHolder,里头有:

1
2
3
4
5
6
7
public class BeanDefinitionHolder implements BeanMetadataElement {
	private final BeanDefinition beanDefinition;
	private final String beanName;
	@Nullable
	private final String[] aliases;
	...
}

先来看看怎么注册Bean:

BeanDefinitionReaderUtils.java

1
2
3
4
5
6
7
8
9
10
11
12
13
14
15
16
17
public static void registerBeanDefinition(
        BeanDefinitionHolder definitionHolder, BeanDefinitionRegistry registry)
        throws BeanDefinitionStoreException {

    // 用bean名称注册Bean.
    String beanName = definitionHolder.getBeanName();
    registry.registerBeanDefinition(beanName, definitionHolder.getBeanDefinition());

    // 注册bean别名
    // 保存alias -> beanName 的关系,根据alias找到beanName,再找到Bean
    String[] aliases = definitionHolder.getAliases();
    if (aliases != null) {
        for (String alias : aliases) {
            registry.registerAlias(beanName, alias);
        }
    }
}

DefaultListableBeanFactory.java

1
2
3
4
5
6
7
8
9
10
11
12
13
14
15
16
17
18
19
20
21
22
23
24
25
26
27
28
29
30
31
32
33
34
35
36
37
38
39
40
41
42
43
44
45
46
47
48
49
50
51
52
53
54
55
56
57
58
59
60
61
62
63
64
65
66
67
68
69
70
71
72
73
74
75
76
public void registerBeanDefinition(String beanName, BeanDefinition beanDefinition)
        throws BeanDefinitionStoreException {

    Assert.hasText(beanName, "Bean name must not be empty");
    Assert.notNull(beanDefinition, "BeanDefinition must not be null");

    if (beanDefinition instanceof AbstractBeanDefinition) {
        try {
            ((AbstractBeanDefinition) beanDefinition).validate();
        }
        catch (BeanDefinitionValidationException ex) {
            throw new BeanDefinitionStoreException(beanDefinition.getResourceDescription(), beanName,
                    "Validation of bean definition failed", ex);
        }
    }
    // 从beanDefinitionMap中取出叫该beanName的bd,此处涉及到bean覆盖
    BeanDefinition existingDefinition = this.beanDefinitionMap.get(beanName);
    if (existingDefinition != null) {
        // 不允许覆盖则抛异常
        if (!isAllowBeanDefinitionOverriding()) {
            throw new BeanDefinitionOverrideException(beanName, beanDefinition, existingDefinition);
        }
        // 日志:旧bd角色小于新bd
        // ROLE_APPLICATION < ROLE_SUPPORT < ROLE_INFRASTRUCTURE
        else if (existingDefinition.getRole() < beanDefinition.getRole()) {...}
        // 日志:新(不同的)bd换旧bd
        else if (!beanDefinition.equals(existingDefinition)) {...}
        // 日志:同个bd更新
        else {...}
        this.beanDefinitionMap.put(beanName, beanDefinition);
    }
    else {
        // 判断是否已经有其他的 Bean 开始初始化了.
        // 注意,"注册Bean" 这个动作结束,Bean 依然还没有初始化,我们后面会有大篇幅说初始化过程,
        // 在 Spring 容器启动的最后,会 预初始化 所有的 singleton beans        
        if (hasBeanCreationStarted()) {
            // Cannot modify startup-time collection elements anymore (for stable iteration)
            synchronized (this.beanDefinitionMap) {
                this.beanDefinitionMap.put(beanName, beanDefinition);
                List<String> updatedDefinitions = new ArrayList<>(this.beanDefinitionNames.size() + 1);
                updatedDefinitions.addAll(this.beanDefinitionNames);
                updatedDefinitions.add(beanName);
                this.beanDefinitionNames = updatedDefinitions;
                if (this.manualSingletonNames.contains(beanName)) {
                    Set<String> updatedSingletons = new LinkedHashSet<>(this.manualSingletonNames);
                    updatedSingletons.remove(beanName);
                    this.manualSingletonNames = updatedSingletons;
                }
            }
        }
        // 正常情况下进这个分支:没覆盖,没初始化
        // 仍在spring启动注册阶段
        else {
            // 将 bd 放到这个 map 中,这个 map 保存了所有的 bd
            // private final Map<String, BeanDefinition> beanDefinitionMap = new ConcurrentHashMap<>(256);
            // 默认为256的大小
            this.beanDefinitionMap.put(beanName, beanDefinition);
            // 按照注册顺序保存beanName
            // private volatile List<String> beanDefinitionNames = new ArrayList<>(256);
            this.beanDefinitionNames.add(beanName);
            // 这是个 LinkedHashSet,代表的是手动注册的 singleton bean,
            // 注意这里是 remove 方法,到这里的 Bean 当然不是手动注册的
            // 手动指的是通过调用以下方法注册的 bean :
            //     registerSingleton(String beanName, Object singletonObject)
            // 这不是重点,解释只是为了不让大家疑惑。Spring 会在后面"手动"注册一些 Bean,
            // 如 "environment"、"systemProperties" 等 bean,我们自己也可以在运行时注册 Bean 到容器中的            
            this.manualSingletonNames.remove(beanName);
        }
        // 这个不重要,在预初始化的时候会用到
        this.frozenBeanDefinitionNames = null;
    }

    if (existingDefinition != null || containsSingleton(beanName)) {
        resetBeanDefinition(beanName);
    }
}

OK,到这里为止,已经注册了各bd,并发送了注册事件。下面我们来看看refresh的第3步:

准备Bean容器prepareBeanFactory

AbstractApplicationContext.java

1
2
3
4
5
6
7
8
9
10
11
12
13
14
15
16
17
18
19
20
21
22
23
24
25
26
27
28
29
30
31
32
33
34
35
36
37
38
39
40
41
42
43
44
45
46
47
48
49
50
51
52
53
54
55
56
57
58
protected void prepareBeanFactory(ConfigurableListableBeanFactory beanFactory) {
    // 设置 BeanFactory 的类加载器,BeanFactory 需要加载类,也就需要类加载器,
    // 这里设置为加载当前 ApplicationContext 类的类加载器
    beanFactory.setBeanClassLoader(getClassLoader());
    
    beanFactory.setBeanExpressionResolver(new StandardBeanExpressionResolver(beanFactory.getBeanClassLoader()));
    beanFactory.addPropertyEditorRegistrar(new ResourceEditorRegistrar(this, getEnvironment()));

    // 添加一个 BeanPostProcessor,这个 processor 比较简单:
    // 实现了 Aware 接口的 beans 在初始化的时候,这个 processor 负责回调,
    // 这个我们很常用,如我们会为了获取 ApplicationContext 而 implement ApplicationContextAware
    // 注意:它不仅仅回调 ApplicationContextAware,
    // 还会负责回调 EnvironmentAware、ResourceLoaderAware 等,看下源码就清楚了
    beanFactory.addBeanPostProcessor(new ApplicationContextAwareProcessor(this));
    
    // 下面几行的意思就是,如果某个 bean 依赖于以下几个接口的实现类,在自动装配的时候忽略它们,
    // Spring 会通过其他方式来处理这些依赖。
    beanFactory.ignoreDependencyInterface(EnvironmentAware.class);
    beanFactory.ignoreDependencyInterface(EmbeddedValueResolverAware.class);
    beanFactory.ignoreDependencyInterface(ResourceLoaderAware.class);
    beanFactory.ignoreDependencyInterface(ApplicationEventPublisherAware.class);
    beanFactory.ignoreDependencyInterface(MessageSourceAware.class);
    beanFactory.ignoreDependencyInterface(ApplicationContextAware.class);

    // 下面几行就是为特殊的几个 bean 赋值,如果有 bean 依赖了以下几个,会注入这边相应的值,
    // 之前我们说过,"当前 ApplicationContext 持有一个 BeanFactory",这里解释了第一行
    // ApplicationContext 还继承了 ResourceLoader、ApplicationEventPublisher、MessageSource
    // 所以对于这几个依赖,可以赋值为 this,注意 this 是一个 ApplicationContext
    // 那这里怎么没看到为 MessageSource 赋值呢?那是因为 MessageSource 被注册成为了一个普通的 bean
    beanFactory.registerResolvableDependency(BeanFactory.class, beanFactory);
    beanFactory.registerResolvableDependency(ResourceLoader.class, this);
    beanFactory.registerResolvableDependency(ApplicationEventPublisher.class, this);
    beanFactory.registerResolvableDependency(ApplicationContext.class, this);

    // 这个 BeanPostProcessor 也很简单,在 bean 实例化后,如果是 ApplicationListener 的子类,
    // 那么将其添加到 listener 列表中,可以理解成:注册 事件监听器
    beanFactory.addBeanPostProcessor(new ApplicationListenerDetector(this));

    // 这里涉及到特殊的 bean,名为:loadTimeWeaver,这不是我们的重点,忽略它
    // tips: ltw 是 AspectJ 的概念,指的是在运行期进行织入,这个和 Spring AOP 不一样
    if (beanFactory.containsBean(LOAD_TIME_WEAVER_BEAN_NAME)) {
        beanFactory.addBeanPostProcessor(new LoadTimeWeaverAwareProcessor(beanFactory));
        // Set a temporary ClassLoader for type matching.
        beanFactory.setTempClassLoader(new ContextTypeMatchClassLoader(beanFactory.getBeanClassLoader()));
    }

    // spring默认注册一些的环境相关的bean:
    // environment、systemProperties、systemEnvironment
    if (!beanFactory.containsLocalBean(ENVIRONMENT_BEAN_NAME)) {
        beanFactory.registerSingleton(ENVIRONMENT_BEAN_NAME, getEnvironment());
    }
    if (!beanFactory.containsLocalBean(SYSTEM_PROPERTIES_BEAN_NAME)) {
        beanFactory.registerSingleton(SYSTEM_PROPERTIES_BEAN_NAME, getEnvironment().getSystemProperties());
    }
    if (!beanFactory.containsLocalBean(SYSTEM_ENVIRONMENT_BEAN_NAME)) {
        beanFactory.registerSingleton(SYSTEM_ENVIRONMENT_BEAN_NAME, getEnvironment().getSystemEnvironment());
    }
}

初始化所有的 singleton beans:finishBeanFactoryInitialization

到目前为止,应该说 BeanFactory 已经创建完成,并且所有的实现了 BeanFactoryPostProcessor 接口的 Bean 都已经初始化, 并且其中的 postProcessBeanFactory(factory) 方法已经得到回调执行了。 而且 Spring 已经“手动”注册了一些特殊的 Bean,如 environmentsystemProperties 等。

(这里我们跳过了refresh中的一大段,直接进入重点关注对象)

AbstractApplicationContext.java

1
2
3
4
5
6
7
8
9
10
11
12
13
14
15
16
17
18
19
20
21
22
23
24
25
26
27
28
29
30
31
32
33
protected void finishBeanFactoryInitialization(ConfigurableListableBeanFactory beanFactory) {
    // 初始化名为 conversionService 的bean
    // 该bean最有用的场景就是前端传来的值转化成后端Controller需要的参数
    if (beanFactory.containsBean(CONVERSION_SERVICE_BEAN_NAME) &&
            beanFactory.isTypeMatch(CONVERSION_SERVICE_BEAN_NAME, ConversionService.class)) {
        beanFactory.setConversionService(
                // 这个是用来实例化的,下面看
                beanFactory.getBean(CONVERSION_SERVICE_BEAN_NAME, ConversionService.class));
    }

    // Register a default embedded value resolver if no bean post-processor
    // (such as a PropertyPlaceholderConfigurer bean) registered any before:
    // at this point, primarily for resolution in annotation attribute values.
    if (!beanFactory.hasEmbeddedValueResolver()) {
        beanFactory.addEmbeddedValueResolver(strVal -> getEnvironment().resolvePlaceholders(strVal));
    }

    // Initialize LoadTimeWeaverAware beans early to allow for registering their transformers early.
    String[] weaverAwareNames = beanFactory.getBeanNamesForType(LoadTimeWeaverAware.class, false, false);
    for (String weaverAwareName : weaverAwareNames) {
        getBean(weaverAwareName);
    }

    // Stop using the temporary ClassLoader for type matching.
    beanFactory.setTempClassLoader(null);

    // 没什么别的目的,因为到这一步的时候,Spring 已经开始预初始化 singleton beans 了,
    // 肯定不希望这个时候还出现 bean 定义解析、加载、注册。
    beanFactory.freezeConfiguration();

    // 实例化所有非懒加载的单例bean
    beanFactory.preInstantiateSingletons();
}

DefaultListableBeanFactory.java

1
2
3
4
5
6
7
8
9
10
11
12
13
14
15
16
17
18
19
20
21
22
23
24
25
26
27
28
29
30
31
32
33
34
35
36
37
38
39
40
41
42
43
44
45
46
47
48
49
50
51
52
53
54
55
56
57
@Override
public void preInstantiateSingletons() throws BeansException {
    // 获取所有的 BeanName
    List<String> beanNames = new ArrayList<>(this.beanDefinitionNames);

    // 触发所有的非懒加载的 singleton beans 的初始化操作
    for (String beanName : beanNames) {
        // 合并父 Bean 中的配置,就是 <bean id="" class="" parent="" /> 中的 parent
        RootBeanDefinition bd = getMergedLocalBeanDefinition(beanName);
        // 非抽象、非懒加载的单例Bean
        if (!bd.isAbstract() && bd.isSingleton() && !bd.isLazyInit()) {
            // FactoryBean适用于一些比较复杂的Bean,如数据库连接池的创建
            if (isFactoryBean(beanName)) {
                // 在bean名前加“&”再实例化
                Object bean = getBean(FACTORY_BEAN_PREFIX + beanName);
                if (bean instanceof FactoryBean) {
                    final FactoryBean<?> factory = (FactoryBean<?>) bean;
                    boolean isEagerInit;
                    if (System.getSecurityManager() != null && factory instanceof SmartFactoryBean) {
                        isEagerInit = AccessController.doPrivileged((PrivilegedAction<Boolean>)
                                        ((SmartFactoryBean<?>) factory)::isEagerInit,
                                getAccessControlContext());
                    }
                    else {
                        isEagerInit = (factory instanceof SmartFactoryBean &&
                                ((SmartFactoryBean<?>) factory).isEagerInit());
                    }
                    if (isEagerInit) {
                        getBean(beanName);
                    }
                }
            }
            // 普通的Bean,直接调用getBean()
            else {
                getBean(beanName);
            }
        }
    }

    // 到这里说明所有的非懒加载的 singleton beans 已经完成了初始化
    // 如果我们定义的 bean 是实现了 SmartInitializingSingleton 接口的,那么在这里得到回调,忽略
    for (String beanName : beanNames) {
        Object singletonInstance = getSingleton(beanName);
        if (singletonInstance instanceof SmartInitializingSingleton) {
            final SmartInitializingSingleton smartSingleton = (SmartInitializingSingleton) singletonInstance;
            if (System.getSecurityManager() != null) {
                AccessController.doPrivileged((PrivilegedAction<Object>) () -> {
                    smartSingleton.afterSingletonsInstantiated();
                    return null;
                }, getAccessControlContext());
            }
            else {
                smartSingleton.afterSingletonsInstantiated();
            }
        }
    }
}

接下来讲一下getBean()

AbstractBeanFactory.java

1
2
3
4
5
6
7
8
9
10
11
12
13
14
15
16
17
18
19
20
21
22
23
24
25
26
27
28
29
30
31
32
33
34
35
36
37
38
39
40
41
42
43
44
45
46
47
48
49
50
51
52
53
54
55
56
57
58
59
60
61
62
63
64
65
66
67
68
69
70
71
72
73
74
75
76
77
78
79
80
81
82
83
84
85
86
87
88
89
90
91
92
93
94
95
96
97
98
99
100
101
102
103
104
105
106
107
108
109
110
111
112
113
114
115
116
117
118
119
120
121
122
123
124
125
126
127
128
129
130
131
132
133
134
135
136
137
138
139
140
141
142
143
144
145
146
147
148
149
150
151
152
153
154
155
156
157
158
159
160
161
@Override
public Object getBean(String name) throws BeansException {
    return doGetBean(name, null, null, false);
}

// 该方法在bean已经初始化过了时直接从容器返回,否则先初始化再返回
@SuppressWarnings("unchecked")
protected <T> T doGetBean(final String name, @Nullable final Class<T> requiredType,
        @Nullable final Object[] args, boolean typeCheckOnly) throws BeansException {
    // 获取一个 “正统的” beanName,处理两种情况,一个是前面说的 FactoryBean(前面带 ‘&’),
    // 一个是别名问题,因为这个方法是 getBean,获取 Bean 用的,你要是传一个别名进来,是完全可以的
    final String beanName = transformedBeanName(name);
    
    Object bean;    // 这个是返回值

    // 检查是否已经创建过了
    Object sharedInstance = getSingleton(beanName);
    if (sharedInstance != null && args == null) {
        // 如果是FactoryBean,则返回它创建的那个对象
        // 否则直接返回sharedInstance
        bean = getObjectForBeanInstance(sharedInstance, name, beanName, null);
    }
    else {
        // 创建过了此 beanName 的 prototype 类型的 bean,那么抛异常,
        // 往往是因为陷入了循环引用
        if (isPrototypeCurrentlyInCreation(beanName)) {
            throw new BeanCurrentlyInCreationException(beanName);
        }

        // 检查该bd在容器中是否存在
        BeanFactory parentBeanFactory = getParentBeanFactory();
        if (parentBeanFactory != null && !containsBeanDefinition(beanName)) {
            // 若没有,在父容器中找找看
            String nameToLookup = originalBeanName(name);
            if (parentBeanFactory instanceof AbstractBeanFactory) {
                return ((AbstractBeanFactory) parentBeanFactory).doGetBean(
                        nameToLookup, requiredType, args, typeCheckOnly);
            }
            else if (args != null) {
                // Delegation to parent with explicit args.
                return (T) parentBeanFactory.getBean(nameToLookup, args);
            }
            else if (requiredType != null) {
                // No args -> delegate to standard getBean method.
                return parentBeanFactory.getBean(nameToLookup, requiredType);
            }
            else {
                return (T) parentBeanFactory.getBean(nameToLookup);
            }
        }
        
        // 这里typeCheckOnly是false,将beanName放入Set集合alreadyCreated中
        if (!typeCheckOnly) {
            markBeanAsCreated(beanName);
        }

        // 稍稍总结一下:
        // 到这里的话,要准备创建 Bean 了,对于 singleton 的 Bean 来说,容器中还没创建过此 Bean;
        // 对于 prototype 的 Bean 来说,本来就是要创建一个新的 Bean。
        try {
            final RootBeanDefinition mbd = getMergedLocalBeanDefinition(beanName);
            checkMergedBeanDefinition(mbd, beanName, args);

            // 初始化依赖项
            String[] dependsOn = mbd.getDependsOn();
            if (dependsOn != null) {
                for (String dep : dependsOn) {
                    // 若出现循环依赖,则抛出异常
                    if (isDependent(beanName, dep)) {
                        throw new BeanCreationException(mbd.getResourceDescription(), beanName,
                                "Circular depends-on relationship between '" + beanName + "' and '" + dep + "'");
                    }
                    // 注册依赖关系
                    registerDependentBean(dep, beanName);
                    try {
                        // 初始化依赖项
                        getBean(dep);
                    }
                    catch (NoSuchBeanDefinitionException ex) {
                        throw new BeanCreationException(mbd.getResourceDescription(), beanName,
                                "'" + beanName + "' depends on missing bean '" + dep + "'", ex);
                    }
                }
            }

            // 创建Singleton型Bean
            if (mbd.isSingleton()) {
                sharedInstance = getSingleton(beanName, () -> {
                    try {
                        // 创建Bean的方法
                        return createBean(beanName, mbd, args);
                    }
                    catch (BeansException ex) {
                        // 创建失败则从各缓存中移除该BeanName
                        destroySingleton(beanName);
                        throw ex;
                    }
                });
                bean = getObjectForBeanInstance(sharedInstance, name, beanName, mbd);
            }
            // 创建Prototype型Bean
            else if (mbd.isPrototype()) {
                // It's a prototype -> create a new instance.
                Object prototypeInstance = null;
                try {
                    beforePrototypeCreation(beanName);
                    prototypeInstance = createBean(beanName, mbd, args);
                }
                finally {
                    afterPrototypeCreation(beanName);
                }
                bean = getObjectForBeanInstance(prototypeInstance, name, beanName, mbd);
            }
            // 其它Scope的Bean则委托相应的实现类来完成创建
            else {
                String scopeName = mbd.getScope();
                final Scope scope = this.scopes.get(scopeName);
                if (scope == null) {
                    throw new IllegalStateException("No Scope registered for scope name '" + scopeName + "'");
                }
                try {
                    Object scopedInstance = scope.get(beanName, () -> {
                        beforePrototypeCreation(beanName);
                        try {
                            return createBean(beanName, mbd, args);
                        }
                        finally {
                            afterPrototypeCreation(beanName);
                        }
                    });
                    bean = getObjectForBeanInstance(scopedInstance, name, beanName, mbd);
                }
                catch (IllegalStateException ex) {
                    throw new BeanCreationException(beanName,
                            "Scope '" + scopeName + "' is not active for the current thread; consider " +
                            "defining a scoped proxy for this bean if you intend to refer to it from a singleton",
                            ex);
                }
            }
        }
        catch (BeansException ex) {
            cleanupAfterBeanCreationFailure(beanName);
            throw ex;
        }
    }

    // 最后校验类型是否正确
    if (requiredType != null && !requiredType.isInstance(bean)) {
        try {
            T convertedBean = getTypeConverter().convertIfNecessary(bean, requiredType);
            if (convertedBean == null) {
                throw new BeanNotOfRequiredTypeException(name, requiredType, bean.getClass());
            }
            return convertedBean;
        }
        catch (TypeMismatchException ex) {
            throw new BeanNotOfRequiredTypeException(name, requiredType, bean.getClass());
        }
    }
    return (T) bean;
}

接下来要讲的是createBean方法:

AbstractBeanFactory.java

1
2
protected abstract Object createBean(String beanName, RootBeanDefinition mbd, @Nullable Object[] args)
        throws BeanCreationException;

第三个参数args就是要给构造器或FactoryBean的参数,但是在初始化Singleton时,传的是null。

这回要用到一个新的类AbstractAutowireCapableBeanFactory.java,顾名思义,和自动注入有关,主要为了以下场景:

1
2
3
4
5
6
7
8
public class MessageServiceImpl implements MessageService {
    @Autowired
    private UserService userService;

    public String getMessage() {
        return userService.getMessage();
    }
}
1
<bean id="messageService" class="com.javadoop.example.MessageServiceImpl" />

这是一种混用的场景,Spring会自动处理这种情况。知道这回事就行,继续向前:

AbstractAutowireCapableBeanFactory.java

1
2
3
4
5
6
7
8
9
10
11
12
13
14
15
16
17
18
19
20
21
22
23
24
25
26
27
28
29
30
31
32
33
34
35
36
37
38
39
40
41
42
43
44
45
46
47
48
49
50
51
52
@Override
protected Object createBean(String beanName, RootBeanDefinition mbd, @Nullable Object[] args)
        throws BeanCreationException {
    RootBeanDefinition mbdToUse = mbd;

    // 确保BeanDefinition的class已加载
    Class<?> resolvedClass = resolveBeanClass(mbd, beanName);
    if (resolvedClass != null && !mbd.hasBeanClass() && mbd.getBeanClassName() != null) {
        mbdToUse = new RootBeanDefinition(mbd);
        mbdToUse.setBeanClass(resolvedClass);
    }


    // 准备方法覆写,这里又涉及到一个概念:MethodOverrides,它来自于 bean 定义中的 <lookup-method /> 
    // 和 <replaced-method />,如果读者感兴趣,回到 bean 解析的地方看看对这两个标签的解析。
    // 我在附录中也对这两个标签的相关知识点进行了介绍,读者可以移步去看看
    try {
        mbdToUse.prepareMethodOverrides();
    }
    catch (BeanDefinitionValidationException ex) {
        throw new BeanDefinitionStoreException(mbdToUse.getResourceDescription(),
                beanName, "Validation of method overrides failed", ex);
    }

    try {
        // 让 InstantiationAwareBeanPostProcessor 在这一步有机会返回代理,
	// 但前提是对于相应的 bean 我们有自定义的 TargetSource 实现;
	// 注意:这里是在“实例化”bean的前后进行操作
	// 而AOP中生成bean代理的操作是在实例化后初始化的前后进行操作
        Object bean = resolveBeforeInstantiation(beanName, mbdToUse);
        if (bean != null) {
            return bean;
        }
    }
    catch (Throwable ex) {
        throw new BeanCreationException(mbdToUse.getResourceDescription(), beanName,
                "BeanPostProcessor before instantiation of bean failed", ex);
    }

    try {
        // 关键方法:创建Bean
        Object beanInstance = doCreateBean(beanName, mbdToUse, args);
        return beanInstance;
    }
    catch (BeanCreationException | ImplicitlyAppearedSingletonException ex) {
        throw ex;
    }
    catch (Throwable ex) {
        throw new BeanCreationException(
                mbdToUse.getResourceDescription(), beanName, "Unexpected exception during bean creation", ex);
    }
}

doCreateBean()

1
2
3
4
5
6
7
8
9
10
11
12
13
14
15
16
17
18
19
20
21
22
23
24
25
26
27
28
29
30
31
32
33
34
35
36
37
38
39
40
41
42
43
44
45
46
47
48
49
50
51
52
53
54
55
56
57
58
59
60
61
62
63
64
65
66
67
68
69
70
71
72
73
74
75
76
77
78
79
80
81
82
83
84
85
86
87
88
89
90
91
92
93
94
95
96
97
protected Object doCreateBean(final String beanName, final RootBeanDefinition mbd, final @Nullable Object[] args)
        throws BeanCreationException {

    // Instantiate the bean.
    BeanWrapper instanceWrapper = null;
    if (mbd.isSingleton()) {
        instanceWrapper = this.factoryBeanInstanceCache.remove(beanName);
    }
    // 说明不是 FactoryBean,这里实例化 Bean,这里非常关键,细节之后再说
    if (instanceWrapper == null) {
        instanceWrapper = createBeanInstance(beanName, mbd, args);
    }
    // 这个就是 Bean 里面的 我们定义的类 的实例,很多地方我直接描述成 "bean 实例"
    final Object bean = instanceWrapper.getWrappedInstance();
    Class<?> beanType = instanceWrapper.getWrappedClass();
    if (beanType != NullBean.class) {
        mbd.resolvedTargetType = beanType;
    }

    // Allow post-processors to modify the merged bean definition.
    synchronized (mbd.postProcessingLock) {
        if (!mbd.postProcessed) {
            try {
                applyMergedBeanDefinitionPostProcessors(mbd, beanType, beanName);
            }
            catch (Throwable ex) {
                throw new BeanCreationException(mbd.getResourceDescription(), beanName,
                        "Post-processing of merged bean definition failed", ex);
            }
            mbd.postProcessed = true;
        }
    }

    // 下面这块代码是为了解决循环依赖的问题
    boolean earlySingletonExposure = (mbd.isSingleton() && this.allowCircularReferences &&
            isSingletonCurrentlyInCreation(beanName));
    if (earlySingletonExposure) {
        addSingletonFactory(beanName, () -> getEarlyBeanReference(beanName, mbd, bean));
    }

    // Initialize the bean instance.
    Object exposedObject = bean;
    try {
        // 这一步也是非常关键的,这一步负责属性装配,因为前面的实例只是实例化了,并没有设值,这里就是设值
        populateBean(beanName, mbd, instanceWrapper);
        // 还记得 init-method 吗?还有 InitializingBean 接口?还有 BeanPostProcessor 接口?
        // 这里就是处理 bean 初始化完成后的各种回调
        exposedObject = initializeBean(beanName, exposedObject, mbd);
    }
    catch (Throwable ex) {
        if (ex instanceof BeanCreationException && beanName.equals(((BeanCreationException) ex).getBeanName())) {
            throw (BeanCreationException) ex;
        }
        else {
            throw new BeanCreationException(
                    mbd.getResourceDescription(), beanName, "Initialization of bean failed", ex);
        }
    }

    if (earlySingletonExposure) {
        Object earlySingletonReference = getSingleton(beanName, false);
        if (earlySingletonReference != null) {
            if (exposedObject == bean) {
                exposedObject = earlySingletonReference;
            }
            else if (!this.allowRawInjectionDespiteWrapping && hasDependentBean(beanName)) {
                String[] dependentBeans = getDependentBeans(beanName);
                Set<String> actualDependentBeans = new LinkedHashSet<>(dependentBeans.length);
                for (String dependentBean : dependentBeans) {
                    if (!removeSingletonIfCreatedForTypeCheckOnly(dependentBean)) {
                        actualDependentBeans.add(dependentBean);
                    }
                }
                if (!actualDependentBeans.isEmpty()) {
                    throw new BeanCurrentlyInCreationException(beanName,
                            "Bean with name '" + beanName + "' has been injected into other beans [" +
                            StringUtils.collectionToCommaDelimitedString(actualDependentBeans) +
                            "] in its raw version as part of a circular reference, but has eventually been " +
                            "wrapped. This means that said other beans do not use the final version of the " +
                            "bean. This is often the result of over-eager type matching - consider using " +
                            "'getBeanNamesOfType' with the 'allowEagerInit' flag turned off, for example.");
                }
            }
        }
    }

    // Register bean as disposable.
    try {
        registerDisposableBeanIfNecessary(beanName, bean, mbd);
    }
    catch (BeanDefinitionValidationException ex) {
        throw new BeanCreationException(
                mbd.getResourceDescription(), beanName, "Invalid destruction signature", ex);
    }

    return exposedObject;
}

到此为止,已经说完了整个初始化过程,再来讲一下doCreateBean方法中的三个方法:

  1. createBeanInstance,创建实例
  2. populateBean,依赖属性注入
  3. initializeBean,回调方法

先看创建实例的方法:

AbstractAutowireCapableBeanFactory.java

1
2
3
4
5
6
7
8
9
10
11
12
13
14
15
16
17
18
19
20
21
22
23
24
25
26
27
28
29
30
31
32
33
34
35
36
37
38
39
40
41
42
43
44
45
46
47
48
49
50
51
52
53
54
55
56
57
58
59
60
61
62
63
64
65
66
67
68
69
70
71
72
73
74
75
76
77
78
79
80
81
82
83
84
85
protected BeanWrapper createBeanInstance(String beanName, RootBeanDefinition mbd, @Nullable Object[] args) {
    // 再次确保bean的class是否已经加载
    Class<?> beanClass = resolveBeanClass(mbd, beanName);

    // 校验一下这个类的访问权限
    if (beanClass != null && !Modifier.isPublic(beanClass.getModifiers()) && !mbd.isNonPublicAccessAllowed()) {
        throw new BeanCreationException(mbd.getResourceDescription(), beanName,
                "Bean class isn't public, and non-public access not allowed: " + beanClass.getName());
    }

    Supplier<?> instanceSupplier = mbd.getInstanceSupplier();
    if (instanceSupplier != null) {
        return obtainFromSupplier(instanceSupplier, beanName);
    }

    if (mbd.getFactoryMethodName() != null) {
        // 采用工厂模式进行实例化
        return instantiateUsingFactoryMethod(beanName, mbd, args);
    }

    // 如果不是第一次创建,比如第二次创建 prototype bean。
    // 这种情况下,我们可以从第一次创建知道,采用无参构造函数,还是构造函数依赖注入 来完成实例化
    boolean resolved = false;
    boolean autowireNecessary = false;
    if (args == null) {
        synchronized (mbd.constructorArgumentLock) {
            if (mbd.resolvedConstructorOrFactoryMethod != null) {
                resolved = true;
                autowireNecessary = mbd.constructorArgumentsResolved;
            }
        }
    }
    if (resolved) {
        if (autowireNecessary) {
            // 构造函数依赖注入
            return autowireConstructor(beanName, mbd, null, null);
        }
        else {
            // 无参构造函数
            return instantiateBean(beanName, mbd);
        }
    }

    // 判断是否采用有参构造函数
    Constructor<?>[] ctors = determineConstructorsFromBeanPostProcessors(beanClass, beanName);
    if (ctors != null || mbd.getResolvedAutowireMode() == AUTOWIRE_CONSTRUCTOR ||
            mbd.hasConstructorArgumentValues() || !ObjectUtils.isEmpty(args)) {
        // 构造函数依赖注入
        return autowireConstructor(beanName, mbd, ctors, args);
    }

    // Preferred constructors for default construction?
    ctors = mbd.getPreferredConstructors();
    if (ctors != null) {
        return autowireConstructor(beanName, mbd, ctors, null);
    }

    // 调用无参构造函数
    return instantiateBean(beanName, mbd);
}

// 看一下无参构造函数
protected BeanWrapper instantiateBean(final String beanName, final RootBeanDefinition mbd) {
    try {
        Object beanInstance;
        final BeanFactory parent = this;
        if (System.getSecurityManager() != null) {
            beanInstance = AccessController.doPrivileged((PrivilegedAction<Object>) () ->
                    getInstantiationStrategy().instantiate(mbd, beanName, parent),
                    getAccessControlContext());
        }
        else {
            // 实际的实例化
            beanInstance = getInstantiationStrategy().instantiate(mbd, beanName, parent);
        }
        // 包装一下并返回
        BeanWrapper bw = new BeanWrapperImpl(beanInstance);
        initBeanWrapper(bw);
        return bw;
    }
    catch (Throwable ex) {
        throw new BeanCreationException(
                mbd.getResourceDescription(), beanName, "Instantiation of bean failed", ex);
    }
}

SimpleInstantiationStrategy.java

1
2
3
4
5
6
7
8
9
10
11
12
13
14
15
16
17
18
19
20
21
22
23
24
25
26
27
28
29
30
31
32
33
34
35
36
37
@Override
public Object instantiate(RootBeanDefinition bd, @Nullable String beanName, BeanFactory owner) {
    // 如果不存在方法覆写,那就使用 java 反射进行实例化,否则使用 CGLIB,
    // 方法覆写 请参见附录"方法注入"中对 lookup-method 和 replaced-method 的介绍
    if (!bd.hasMethodOverrides()) {
        Constructor<?> constructorToUse;
        synchronized (bd.constructorArgumentLock) {
            constructorToUse = (Constructor<?>) bd.resolvedConstructorOrFactoryMethod;
            if (constructorToUse == null) {
                final Class<?> clazz = bd.getBeanClass();
                if (clazz.isInterface()) {
                    throw new BeanInstantiationException(clazz, "Specified class is an interface");
                }
                try {
                    if (System.getSecurityManager() != null) {
                        constructorToUse = AccessController.doPrivileged(
                                (PrivilegedExceptionAction<Constructor<?>>) clazz::getDeclaredConstructor);
                    }
                    else {
                        constructorToUse = clazz.getDeclaredConstructor();
                    }
                    bd.resolvedConstructorOrFactoryMethod = constructorToUse;
                }
                catch (Throwable ex) {
                    throw new BeanInstantiationException(clazz, "No default constructor found", ex);
                }
            }
        }
        // 利用构造方法进行实例化
        return BeanUtils.instantiateClass(constructorToUse);
    }
    else {
        // 存在方法覆写,利用 CGLIB 来完成实例化,需要依赖于 CGLIB 生成子类,这里就不展开了。
        // tips: 因为如果不使用 CGLIB 的话,存在 override 的情况 JDK 并没有提供相应的实例化支持
        return instantiateWithMethodInjection(bd, beanName, owner);
    }
}

再看看依赖属性注入的方法:

AbstractAutowireCapableBeanFactory.java

1
2
3
4
5
6
7
8
9
10
11
12
13
14
15
16
17
18
19
20
21
22
23
24
25
26
27
28
29
30
31
32
33
34
35
36
37
38
39
40
41
42
43
44
45
46
47
48
49
50
51
52
53
54
55
56
57
58
59
60
61
62
63
64
65
66
67
68
69
70
71
72
73
74
75
76
77
78
79
80
81
82
83
84
85
86
87
88
protected void populateBean(String beanName, RootBeanDefinition mbd, @Nullable BeanWrapper bw) {
    if (bw == null) {
        if (mbd.hasPropertyValues()) {
            throw new BeanCreationException(
                    mbd.getResourceDescription(), beanName, "Cannot apply property values to null instance");
        }
        else {
            // Skip property population phase for null instance.
            return;
        }
    }

    // 到这步的时候,bean 实例化完成(通过工厂方法或构造方法),但是还没开始属性设值,
    // InstantiationAwareBeanPostProcessor 的实现类可以在这里对 bean 进行状态修改,
    // 我也没找到有实际的使用,所以我们暂且忽略这块吧
    boolean continueWithPropertyPopulation = true;

    if (!mbd.isSynthetic() && hasInstantiationAwareBeanPostProcessors()) {
        for (BeanPostProcessor bp : getBeanPostProcessors()) {
            if (bp instanceof InstantiationAwareBeanPostProcessor) {
                InstantiationAwareBeanPostProcessor ibp = (InstantiationAwareBeanPostProcessor) bp;
                // 如果返回 false,代表不需要进行后续的属性设值,也不需要再经过其他的 BeanPostProcessor 的处理
                if (!ibp.postProcessAfterInstantiation(bw.getWrappedInstance(), beanName)) {
                    continueWithPropertyPopulation = false;
                    break;
                }
            }
        }
    }

    if (!continueWithPropertyPopulation) {
        return;
    }

    PropertyValues pvs = (mbd.hasPropertyValues() ? mbd.getPropertyValues() : null);

    if (mbd.getResolvedAutowireMode() == AUTOWIRE_BY_NAME || mbd.getResolvedAutowireMode() == AUTOWIRE_BY_TYPE) {
        MutablePropertyValues newPvs = new MutablePropertyValues(pvs);
        // 通过名字找到所有属性值,如果是 bean 依赖,先初始化依赖的 bean。记录依赖关系
        if (mbd.getResolvedAutowireMode() == AUTOWIRE_BY_NAME) {
            autowireByName(beanName, mbd, bw, newPvs);
        }
        // 通过类型装配。
        if (mbd.getResolvedAutowireMode() == AUTOWIRE_BY_TYPE) {
            autowireByType(beanName, mbd, bw, newPvs);
        }
        pvs = newPvs;
    }

    boolean hasInstAwareBpps = hasInstantiationAwareBeanPostProcessors();
    boolean needsDepCheck = (mbd.getDependencyCheck() != AbstractBeanDefinition.DEPENDENCY_CHECK_NONE);

    PropertyDescriptor[] filteredPds = null;
    if (hasInstAwareBpps) {
        if (pvs == null) {
            pvs = mbd.getPropertyValues();
        }
        for (BeanPostProcessor bp : getBeanPostProcessors()) {
            if (bp instanceof InstantiationAwareBeanPostProcessor) {
                InstantiationAwareBeanPostProcessor ibp = (InstantiationAwareBeanPostProcessor) bp;
                // 这里有个非常有用的 BeanPostProcessor 进到这里: AutowiredAnnotationBeanPostProcessor
                // 对采用 @Autowired、@Value 注解的依赖进行设值
                PropertyValues pvsToUse = ibp.postProcessProperties(pvs, bw.getWrappedInstance(), beanName);
                if (pvsToUse == null) {
                    if (filteredPds == null) {
                        filteredPds = filterPropertyDescriptorsForDependencyCheck(bw, mbd.allowCaching);
                    }
                    pvsToUse = ibp.postProcessPropertyValues(pvs, filteredPds, bw.getWrappedInstance(), beanName);
                    if (pvsToUse == null) {
                        return;
                    }
                }
                pvs = pvsToUse;
            }
        }
    }
    if (needsDepCheck) {
        if (filteredPds == null) {
            filteredPds = filterPropertyDescriptorsForDependencyCheck(bw, mbd.allowCaching);
        }
        checkDependencies(beanName, mbd, filteredPds, pvs);
    }

    if (pvs != null) {
        // 设置 bean 实例的属性值
        applyPropertyValues(beanName, mbd, bw, pvs);
    }
}

最后讲讲回调处理:

AbstractAutowireCapableBeanFactory.java

1
2
3
4
5
6
7
8
9
10
11
12
13
14
15
16
17
18
19
20
21
22
23
24
25
26
27
28
29
30
31
32
33
34
35
protected Object initializeBean(final String beanName, final Object bean, @Nullable RootBeanDefinition mbd) {
    if (System.getSecurityManager() != null) {
        AccessController.doPrivileged((PrivilegedAction<Object>) () -> {
            invokeAwareMethods(beanName, bean);
            return null;
        }, getAccessControlContext());
    }
    // 如果 bean 实现了 BeanNameAware、BeanClassLoaderAware 或 BeanFactoryAware 接口,回调
    else {
        invokeAwareMethods(beanName, bean);
    }

    Object wrappedBean = bean;
    if (mbd == null || !mbd.isSynthetic()) {
        // BeanPostProcessor 的 postProcessBeforeInitialization 回调
        wrappedBean = applyBeanPostProcessorsBeforeInitialization(wrappedBean, beanName);
    }

    try {
        // 处理 bean 中定义的 init-method,
        // 或者如果 bean 实现了 InitializingBean 接口,调用 afterPropertiesSet() 方法
        invokeInitMethods(beanName, wrappedBean, mbd);
    }
    catch (Throwable ex) {
        throw new BeanCreationException(
                (mbd != null ? mbd.getResourceDescription() : null),
                beanName, "Invocation of init method failed", ex);
    }
    if (mbd == null || !mbd.isSynthetic()) {
        // BeanPostProcessor 的 postProcessAfterInitialization 回调
        wrappedBean = applyBeanPostProcessorsAfterInitialization(wrappedBean, beanName);
    }

    return wrappedBean;
}

总结

加载BeanDefinition

加载BeanDefinition是注册Bean到工厂中的关键方法,其大致调用流程如下图所示: 加载BeanDefinition流程