一、线程池总览
先看一下线程池的几个“直系”关系:
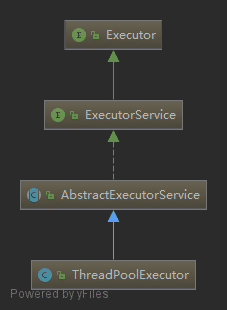
Executor位于最顶层,也是最简单的,只有一个execute(Runnable)方法;ExecutorService继承了Executor接口,在其基础上增加了诸如shutdown()的管理方法;AbstractExecutorService则是实现了ExecutorService的抽象类,实现了一些有用的方法供子类直接调用;ThreadPoolExecutor是直接可以拿来用的类,提供了关于线程池的丰富的功能。
此外,和线程池有关的还有以下这些类:

Executors,一见类名中的‘s’,就知道是个工具类了,可以方便地创建一些线程池;Future这边的类,则是用来支持线程执行返回结果的,在线程池中,每个任务都是包装成FutureTask给线程执行的;BlockingQueue是线程池中的等待队列,其具体作用在下文源码分析中会讲到。
对相关的类有了一些概念后,下面便以线程池的几个直系类或接口,开始源码之旅。
二、Executor 接口
1 | |
简单到无需多言。 不过还是根据其注释唠一唠这个接口的设计思想。
有了线程池后我们不需要再手动去new一个Thread去执行任务,而是向线程池提交即可,就像这样:
1 | |
正常情况下,每个任务进来就会有一个线程去执行,就像这样:
1 | |
但若希望线程池串行执行任务,也可以这么来(谁又会这么搞呢?):
1 | |
总的来说,Executor这个接口只能提交任务。如果想要更丰富的功能,如想知道执行结果、管理线程池等,
就需要继承了这个接口的 ExecutorService了。
三、ExecutorService 接口
1 | |
可以看到已经有较丰富的方法了,经常用这个接口作为线程池的静态类型。
来看一个两段式的线程池关闭方式:
1 | |
四、AbstractExecutorService 抽象类
AbstractExecutorService 实现了 ExecutorService 中的submit/invokeAll/invokeAny方法。
先来看一下几个submit方法:
1 | |
可以看到,几个submit方法均是把参数给封装成 FutureTask任务类后,再执行execute方法。
这里讲到了FutureTask就顺便提一下是如何封装的:
1 | |
其中state参数是volitle类型的。
当传Runable时,需要通过Executors的工具方法将其转化成Callable类型,如下:
1 | |
显然,适配器模式。
// TODO: 几个invoke的方法以后再讲
五、ThreadPoolExecutor 类
5.1 构造方法
ThreadPoolExecutor 是JDK中的线程池实现,可以说是最重要的类了。
在初学线程池的时候,可能都用过Executors的几个静态工厂方法来创建线程池,如:
1 | |
这些方法最终都是调用了 ThreadPoolExecutor类的构造方法:
1 | |
在这个构造方法中,出现了以下7个参数:
corePoolSize:核心线程数maximumPoolSize:最大线程数keepAliveTime:空闲线程存活时间,当线程超过这个时间都没有任务,将会被注销,默认对非核心线程起作用unit:存活时间的单位workQueue:任务队列,核心线程都忙时,新提交的线程放在这里threadFactory:线程工厂,用于生成新线程handler:拒绝策略,当所有线程都忙,队列也满时,对新提交任务的处理策略
除了上述7个参数外,还有几个重要参数,也在这一并罗列:
5.2 ctl: 状态 + 线程数
ThreadPoolExecutor用一个32位数来同时表示线程池的状态及线程数量:
1 | |
其高3位表示状态,低29位表示线程数(最多能达到5亿多吧):
1 | |
这里讲到了线程池的几个状态:
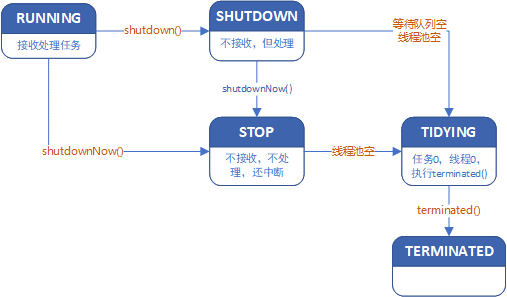
RUNNING:运行状态,此时能接收并处理任务,SHUTDOWN:不接收新任务,但会执行等待队列里的任务STOP:不接收新任务,不执行等待队列的任务,中断正在执行的任务TIDYING:任务执行完,线程数为0,将执行钩子方法terminated()TERMINATED:terminated()执行完毕后的状态
几种状态的转换:
RUNNING->SHUTDOWN:调用了shutdown()方法- (
RUNNINGorSHUTDOWN) ->STOP:调用了shutdownNow() SHUTDOWN->TIDYING:等待队列及线程池为空STOP->TIDYING:线程池为空TIDYING->TERMINATED:钩子方法terminated()执行完毕
如图所示:
5.3 Worker: 工作线程
在线程池内部,有一个重要的类,其名为 Worker,是用来执行任务的线程。
Worker实现了Runnable接口,还继承了AbstractQueuedSynchronized抽象类。可以看到在JUC包中AQS真是无处不在啊。
1 | |
5.4 execute()
有了上面的铺垫,接下来我们来看一下线程池的核心方法execute()。
1 | |
1 | |
简单看下 addWorkerFailed
1 | |
刚才在介绍Worker时说到,启动worker线程时会执行runWorker()方法:
1 | |
再来看一下获取任务的方法getTask()
1 | |
总结一下,getTask()有三种情况会返回null
- 线程池状态为STOP、TIDYING、TERMINATED,或为SHUTDOWN,且队列为空,则返回null;
- 调小了最大线程数,则超出这个数值的线程将被关闭,要返回null;
- 超时了,并且允许销毁当前线程(默认核心线程数内的线程不会被销毁),则返回null。
返回null后,会导致runWorker()方法中跳出while循环,然后调用processWorkerExit进行将worker移除。
1 | |
添加worker失败,会尝试terminate线程池:
1 | |
5.5 拒绝策略
在ThreadPoolExecutor中,已经有默认实现的四种拒绝策略了:
1 | |
其中提交任务的线程自己执行这一策略可以实现一定程度的系统平滑降级,why?
- 当线程池已经饱和,无能力继续向其提交新任务时,由提交任务的线程(T1)自己执行;
- 在执行过程中,T1无法产生新的任务,线程池也可以在此期间减轻负荷量;
- 若仍有源源不断的新的TCP请求到来,将会阻塞在TCP的缓冲区;
- 若TCP的缓冲区满,客户端才会收到报错信息
5.6 关闭线程池
1 | |
1 | |
– over –